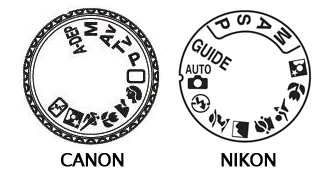
Having
a good understanding of the digital camera modes is essential to control the
exposure in photography. Whether you are a beginner or an advanced amateur, you
should know what each camera mode does and when it should be used, under what
circumstances.
P : Program Mode
In “Program” mode,
the camera automatically chooses the Aperture and the Shutter Speed for you,
based on the amount of light that passes through the lens. This is the mode you
want to use for “point and shoot” moments, when you just need to quickly snap a
picture. The camera will try to balance between aperture and shutter speed,
increasing and decreasing the two based on the intensity of light
S:
Shutter-Priority Mode
In “Shutter
Priority” mode, you manually set the camera’s shutter speed and the camera
automatically picks the right aperture for you, based on the amount of light
that passes through the lens. This mode is intended to be used when motion
needs to be frozen or intentionally blurred. If there is too much light, the
camera will increase the lens aperture to a higher number, which decreases the
amount of light that passes through the lens. If there is not enough light, the
camera will decrease the aperture to the lowest number, so that more light
passes through the lens. So in Shutter Priority mode, the shutter speed stays
the same (what you set it to), while aperture automatically increases and
decreases, based on the amount of light. In addition, there is no control over
subject isolation, because you are letting the camera control the depth of
field.
A :
Aperture-Priority Mode
In “Aperture
Priority” mode, you manually set the lens aperture, while the camera
automatically picks the right shutter speed to properly expose the image. You
have full control over subject isolation and you can play with the depth of
field, because you can increase or decrease the lens aperture and let the
camera do the math on measuring the right shutter speed. If there is too much
light, the camera will automatically increase the shutter speed, while if you
are in a low-light environment, the camera will decrease the shutter speed.
There is almost no risk of having an overexposed or an underexposed image,
because the shutter speed can go as low as 30 seconds and as fast as
1/4000-1/8000th of a second (depending on the camera), which is more than sufficient
for most lighting situations.
This is the mode
that I use 95% of the time, because I have full control over the depth of field
and I know that the image will be properly exposed under normal circumstances.
M : Manual Mode
As the name
suggests, “Manual” mode stands for a full manual control of Aperture and
Shutter Speed. In this mode, you can manually set both the aperture and the
shutter speed to any value you want – the camera lets you fully take over the
exposure controls. This mode is generally used in situations, where the camera
has a hard time figuring out the correct exposure in extreme lighting
situations. For example, if you are photographing a scene with a very bright
area, the camera might incorrectly guess the exposure and either overexpose or
underexpose the rest of the image. In those cases, you can set your camera to
manual mode, then evaluate the amount of light in darker and brighter areas and
override the exposure with your own settings. Manual mode is also useful for
consistency, if you need to make sure that both shutter speed and aperture stay
the same across multiple

No comments:
Post a Comment